Using the event console
The event console is the system's central nervous system, enabling you to view and manage events. It displays the repository of all events that are detected by the system.
To access the event console, click Events in the Navigation menu.

Sorting and filtering events
You can sort and filter events that appear in the event console to customize your view.
You can sort events by any column that appears in the event console. To sort events, click a column header. Clicking the header toggles between ascending and descending sort order.
Filter options appear below each column header. A match value can be any full string or a subset of a string, optionally with the wildcard (*) contained in the values in that column. You can also use "||" (OR), or "!!" (NOT) expressions to further target your filters. For example, typing !!windows in the Event Class filter will return all the non-Windows device events.
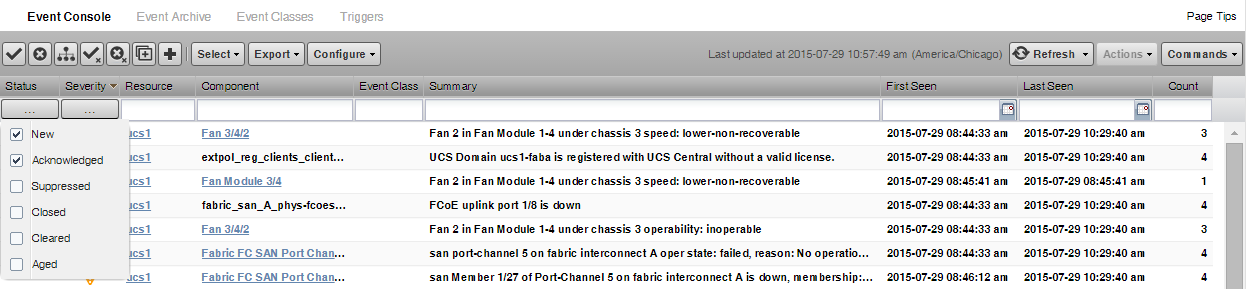
You can filter the events that appear in the list in several ways, depending on the field type:
- Resource - Enter a match value to limit the list.
- Component - Enter a match value to limit the list.
- Event Class - Enter a match value to limit the list.
- Summary - Enter a match value to limit the list.
- First Seen - Enter a value or use a date selection tool to limit the list.
- Last Seen - Enter a value or use a date selection tool to limit the list.
- Count - Enter a value to filter the list, as follows:
- N - Displays events with a count equal to N.
- :N - Displays events with a count less than or equal to N.
- M:N - Displays events with a count between M and *N *(inclusive).
- M: - Displays events with a count greater than or equal to M.
To clear filters, select Configure > Clear filters.
You also can re-arrange the display order of columns in the event console. Click-and-drag column headers to change their display.
Creating an actionable view
For users that are not Administrators, an option filters the list of events to show only those that are not read-only for the user's permission level, and enable the action buttons above the event table header.
To turn on the actionable view, click Configure and select the Only show actionable events check box. The view is changed to show only events that can have an action performed on them based on the user's permission level.
Saving a custom view
Save a custom event console view by bookmarking it for quick access.
- Select Configure > Save this configuration.
-
In the dialog box, select the link, and then drag it to the bookmarks area of the browser window.

The browser adds a link to the bookmarks list.
-
Change the title of the bookmark to distinguish this event console view.
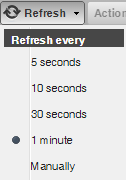
Refreshing the view
You can refresh the list of events manually or specify that they refresh automatically. To manually refresh the view, click Refresh. You can manually refresh at any time, even if you have an automatic refresh increment specified.
To configure automatic refresh, select one of the time increments from the Refresh list. By default, automatic refresh is enabled and set to refresh each minute.
Viewing event details
You can view details for any event in the system. To view details, double-click an event row.
Do not double-click on or near the device (resource) name, component, or event class in the row. Doing this displays details about that entity, rather than information about the event.
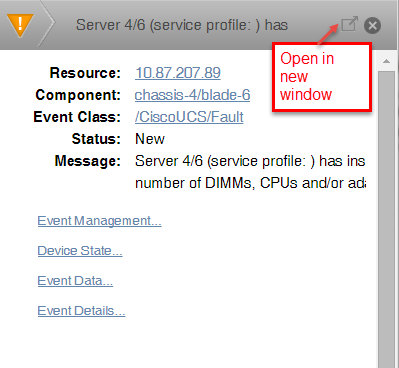
To see more information about the event, click Event Details.
You can use the Log field (located at the bottom of the area) to add specific information about the event. Enter details, and then click Add.
Selecting events
To select one or more events in the list:
- To select a single event, click a row.
- To select multiple events, Ctrl-click each row or Shift-click rows to select a range of events.
- To select all events, click Select > All.
Managing events
Use the event console to manage events or add an event. Click an event row and use the following tools to perform actions.
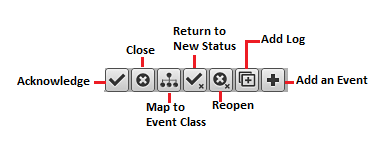
- Acknowledge the event.
- Close the event.
- Reclassify the event by associating it with a specific event class.
- Return the event to New status (revoke its Acknowledged status).
- Reopen the event.
- Add a note to the log.
- Add an event. This feature is useful for testing a specific condition by simulating anevent.