Managing multi-realm networks
Resource Manager supports overlapping IP namespaces through the optional MultiRealmIP ZenPack.
With this ZenPack, Resource Manager can prefix a realm identifier to the IP addresses of a network, enabling unified monitoring. The primary use cases for multi-realm IP management are as follows:
-
A large company that manages multiple locations has defined the same network spaces across the locations, and as a result, created multiple overlapping IP spaces. Resource Manager needs a way to identify each separate IP space in the system.
-
Service providers that are responsible for monitoring multiple customers that have created independent networks and IP spaces that are unique to their location, but not unique to the service provider.
Configuring IP realms
To set up a system, create the IP realms, and then associate them with a collector. The associations between IP realms and actual devices are made automatically by the device's association with the collector. All devices on a collector are associated with the realm for that collector.
The following procedures demonstrate how to set up a Resource Manager system that is similar to the example. If you do not have overlapping IP spaces, use collectors in the same network. Add a machine multiple times, once per collector, changing the device name as you add it.
Deleting networks and adding IP realms
- Navigate to INFRASTRUCTURE > Networks.
- Delete all Resource Manager networks. The networks are automatically recreated with the realm associations that MultiRealmIP adds.
- From the Add menu, select Add IP Realm.
- Add IP realm
r1. - Repeat the steps to add IP realm
r2.
Adding collectors to realms
- Navigate to ADVANCED > Control Center.
- From the Add menu, select Add a new collector.
- Name the collector
coll_r1and specify IP realmr1. - Repeat the steps to add collector
coll_r2and specify IP realmr2.
Adding devices to realms
When you add devices to the system, you can add the same device twice to simulate a multi-realm setup.
-
Navigate to INFRASTRUCTURE > Devices.
-
Add a device called
A.testand select a remote collector. Do not selectlocalhost. For instructions, see Adding a single device. -
Rename the device. For instructions, see Renaming a device.
-
Add the device a second time, selecting a different remote collector; again do not select
localhost. -
In the device list, click the new device name to open the device overview page.
-
In the left panel, choose Model Device. For instructions, see Remodeling a device.
-
In the left panel, choose Software and follow the network link on one of the interfaces. The network was created beneath the realm that you created.
As networks are discovered, they are created within each realm. Monitoring occurs on each representation of the device from the different collectors in different overlapping realms.
(Optional) Navigate to INFRASTRUCTURE > Devices. Search for the devices by IP address. Two devices are returned, one in each realm.
Example multi-realm system
The following diagram shows an example system.
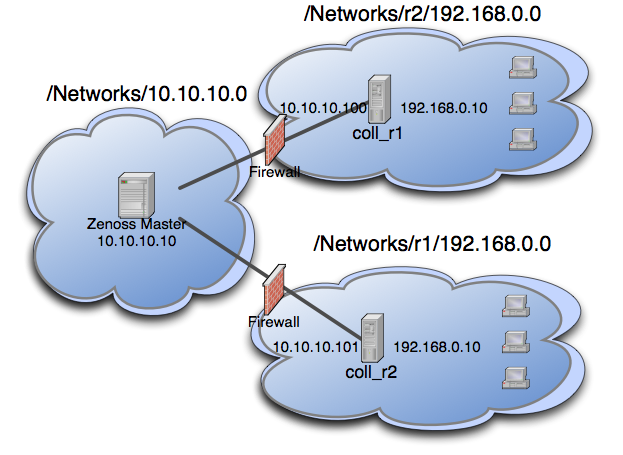
The system contains network 10.10.10.0/24, which has a central Resource Manager server, and is therefore the default network. The default network is treated exactly the same as a Resource Manager system without MultiRealmIP installed.
The system also contains network r1 and network r2. These networks are behind a firewall and have the same IP space,192.168.0.0/24. Each realm has a distributed collector. The Resource Manager server accesses the collector by using an IP translation from the firewall to map the address that is accessible from in front of the firewall to an address that is behind the firewall. Remote collectors in a multi-realm setup must be accessible from the central server using SSH.
Prerequisites and considerations
Review the following information about multi-realm networks.
-
Download and install MultiRealmIP and DistributedCollector.
-
On certain server configurations, if a distributed collector is configured, a "zenpack command failed" error occurs when you install MultiRealmIP. If you encounter this error, run the following grant as MySQL root. Replace user and passwd with the user account and password that Resource Manager uses to access MySQL.
grant super on *.* to 'user'@'{FQDN_of_Zenoss_host}' identified by 'passwd'; -
Before you set up the network, you must delete all Resource Manager networks. The networks are automatically recreated with the realm associations that MultiRealmIP adds.
-
Under multi-realm IP networks, device names must be unique even though the IP addresses overlap.
-
If an event contains the unique name of a device, assigning it the proper device is simple. However, if only the IP address is sent, the event is assigned by looking up the IP within the context of the realm.
-
If a device is moved between realms, the device must be remodeled so that its IPs are placed in the correct location.
-
The Network Map only displays the default realm.